10 Common Product Photography Mistakes
Product photography is an essential premise in e-commerce and can mark the difference between conversion and lack thereof. Different factors dictate the choice of images used in the representation of the products.
Poor camera settings and image composition are the primary causes of common mistakes in product photography. Specific focus by the photographers and art directors will lead to quality photos that will attract views ultimately leading to sales.
1. White Balance
Accurately representing the colours of the product is the primary concern in product photography. White balance is the capturing of the image to represent the right temperature for the products and how they should be represented.
Poor representation of colours leads to dissatisfaction in the customers who may want to buy the products. The temperature should be neither cool nor warm but should be an accurate representation of the products as they appear to the eye.
2. Poor Lighting
Photography is all about lighting, and the representation of products should focus on adequate lighting. The photographer should pay attention to light balancing to ensure that all the sources are balanced and that the images have ample light.
Bad lighting entails lack of adequate brightness, use of direct light, and wrong colour light according to the product under review.
It is solved by ensuring that there is adequate light balancing through the use of a single source. When using artificial lighting, there should be a complimentary light source that will allow for the professional dispersion of light on the product.
3. Image Blurredness
This is one of the leading factors that put off site visitors. Picture quality is one of the most important factors for consideration, and any blurring will lead to the inadequate representation of the product. Blurred images will affect the depiction of the products, and this will affect customer persuasion.
There is no specific control for image sharpness and clarity since it entails ample setting of the camera for the right aperture size. The photographer’s skills and camera specifications will allow for the elimination of this mistake and allow for the capturing of top quality photographs.
4. Background
The choice of background is as important as the product under representation. The background colour should be complementary to the product. Many developers focus on the use of only one backdrop for all the products, therefore leading to the poor representation of the other goods.
A busy background is a common mistake in product photography since it diverts attention from the product. This type of background mostly entails the image taken in the shop while in the midst of other products.
Diversion of the focus of the image will lead to inadequate representation, and consequently low conversion of sales.
5. Poor Product Look
The primary goal of product photography is the representation of the images, and this is dependent on how they look. It is the photographer’s job to ensure that the products under focus appear as they should.
Some of the factors that affect the product representation include creases and dust. Disorganization and lack of orientation of the product will turn off the customers since they will feel that it is not the right product for their use.
6. Small Images
Image size is an essential aspect of picture quality and representation of the details involved. A common mistake in product photography is the dependence on editing for photo enlarging, leading to blurred images. Zooming is an integral tool in e-commerce, and small images will lose their quality.
A standard size for the products is 3000px X 2400px, which is a 5:4 ratio. The images captured under this size maintain their quality even when subjected to zooming, and will allow the clients to scrutinize the goods that they are shopping for carefully.
7. No Product In Use
Consumers always want to experience the product in real life usage, not just the theoretical and purported use that is advocated for by the sellers. This is especially practical in the clothing industry, and most developers do not consider this while uploading their images. The lack of use of the image will lead to the lack of practicality of the products.
Simple solutions to this problem include the use of mannequins or models, to ensure that the consumers get to know how they would look in the products. However, there should be more focus on the applications to ensure that they allow the customers to understand the intended usage of the products immediately.
8. No Variety
Before settling on any product, customers will compare them to others and will want an accurate representation of the image under concern. Product variety entails the depiction of the image in different angles and under different lighting.
Many developers perceive that one image per product is comprehensive enough. However, this is not the case as most consumers would want to know what they are buying explicitly. This is only achievable through the use of multiple images to represent the products. Developers should ensure that any product on sale has enough variety for maximum persuasion to the buyer.
9. Poor Editing
Before posting any product photo, final editing is done to ensure conformity to size, lighting and format balancing. Many developers use their images as is, and do not employ their creativity to create perfect photos through editing software.
Editing entails the cropping of images to perfect sizes, adjustment of the image tones, and colour balance. This will ensure that the photos are bright and well-balanced, and appear life-like.
The lack of focus by developers to proper editing leads to imperfect images that affect how the consumers perceive the products.
10. Watermarking Images
Product photography entails perfection in professionalism and the general representation of the images. Watermarked images are an effort to protect from copyright infringement, but will lead to a depiction of the photos as cluttered and unprofessional. Developers have to understand that their sales are dependent on the sale of the products and not the images, and they should shift their focus as such.
Watermarked images reduce the probability of the pictures being featured by bloggers and influencers, and this will affect the sale of the products.
Amazon Image Requirements and Best Practices
With unlimited selling potential, Amazon Marketplace is one that is full of customers actively searching for your products on a daily basis. However, depending on your business’ niche, it’s likely an overpopulated market so you’ll need to ensure your products stand out.
It’s important to know that Amazon, as a selling platform, has a strict set of rules and guidelines for their images that you must follow when taking your own Amazon product images in order to remain compliant with their Terms of Service.
In this article, we will explain all the Amazon image requirements you need to know as well as the best practices for your product photos – so you can really make the most of your listing.
General Amazon Image Guidelines
When you begin selling your products on Amazon, one of the first things you will need to do is populate each page with good quality, appealing images. However, there are a number of Amazon image requirements that all sellers must follow in order to be successful.
The first photograph on the product page is the main image – this is also the image that shows up on the search results. As a rule of thumb, this image should be the product alone on a white background, adequately filling the frame.
When the product page is expanded, there is the option to add further images and videos – we recommend five photos and one video – for extra detail. These images offer the seller the opportunity to show the product in use or in a different environment. Showing off different angles and features, potentially with infographics is also encouraged.
Amazon Image Requirements for the Main Photo
When using Amazon as a selling platform for your products, your main photo will be the biggest draw for users browsing the website. As this is the photo most commonly seen by your audience, there are a separate set of standards for these images.
All the images you upload to your listing must be aligned with the following Amazon image guidelines:
Image Clarity and Quality Requirements
For starters, all main images must have a pure white background as this is the colour of the Amazon search and product detail pages. Pure white has a RGB colour value of 255, 255, 255, and a hex value of #FFFFFF.
The main image in question also needs to be a single professional photograph of the actual product and nothing else. The image cannot include multiple views of a single product and the entire image needs to be in frame and cannot touch or be cut off the border.
Similarly, no graphics or mockups can be included in the main image. This includes text, logos and watermarks near to or on the product. All main images also have to show products outside of their packaging – this means no boxes, bags or cases unless they are considered a significant feature of the product.
These images also must avoid using a human model either sitting, kneeling, crouching or laying down. However, this doesn’t exclude models with physical disabilities using their mobility aids – including wheelchairs and prosthetics.
Per Amazon image guidelines, no props and accessories that are not included in the purchase and could deliberately confuse the buyer are allowed. If you need a prop to explain the product’s purpose (for example, make-up brushes in the brush holder your business sells), this should be okay as long as it’s clearly stated on the product page that they are not included.
All main images of adult clothing should be photographed on-model, however main images of clothing for children and babies should be photographed flat-lay, without a model.
Multipack apparel items and accessories also need to be flat-lay photographed and accessories should also not show any part of a mannequin – no matter the appearance. Those selling footwear should ensure their main image is of a single shoe, facing left at a 45-degree angle.
Amazon Image Size Requirements
Above all else, the images you use in your Amazon listing must accurately represent the product that is for sale and the product title. The image quality cannot be blurry, pixelated or have jagged edges, with the product filling at least 85% of the frame.
The accepted file formats for images are:
- .jpeg – the preferred option
- .jpg
- .tif,
- .png
- .gif – these cannot be animated
Zoom has been proven to enhance sales. In technical terms, the optimal zoom experience requires files to be over 1600px on the longest side of the image. The longest side cannot exceed 10,000px or go under 500px.
What cannot be featured in your Amazon images?
There are also Amazon image guidelines for what cannot be included in any of your product photos under any circumstances.
No images can contain any suggestion of sexuality or nudity. This includes leotards, underwear and swimwear for children and babies – these images must be taken via flat-lay and not on a human model.
Images must also not contain any hint at an Amazon affiliation. This includes logos, badges, trademarks and modifications. Trademarks and prohibited statements include:
- AMAZON
- PRIME
- ALEXA
- The ‘Amazon Smile’ design
- Amazon’s Choice
- Premium Choice
- Amazon Alexa/Works with Amazon Alexa
- Best Seller
- Top Seller
Best Practices for your Amazon Imagery
Once you’ve considered the do’s and don’ts of your Amazon product gallery, you can then decide how you’d like to approach your secondary images. As you can be more lenient with these images than your main photograph, we can use our vast skills and experience to help you really show off your brand’s personality. When you choose PIC-UP as your designated Amazon photography studio, we can guide you through the following best practices to maximise your sales potential.
Use creative imagery
Creativity always matters in product photography, so it’s important to really show off the USPs of your product and overall brand in your images. Once you’ve researched your ideal target audience, the photography experts at PIC-UP will use their creative flair to display your product to customers in a way most enticing to that demographic.
Text and infographics
Not only does adding text to your photo draw attention to the small print that customers may often ignore in the descriptions, it also gives you the opportunity to fully show off your branding and personality using your own fonts and colour scheme.
There are several different benefits to using an infographic in your gallery. Our photographers will advise you on what to include in your informative images, including how you could highlight a number of different features and perks, list materials or ingredients and go into detail about sizing and dimensions. We can also help you to create a competitor comparison image.
Zoom in on product features
As your customers are unable to get a feel for your product in real life, we often dissect the product on one of your images in order to highlight the key features. By zooming in on the different angles of the product, our product photographers at PIC-UP can help you show customers all the important details they should know – reducing the likelihood of returns.
Use lifestyle shots
Your customers will be interested in how they can use your product in real life, so we use specialist lifestyle photography to hook your target audience by appealing to their wants and needs. Whilst capturing a customer’s attention, our professional images of your product in action can still be informative and depict its intended use.
According to instasize, it’s believed that 95% of purchases are made when the customer has an emotional response to the content. With effective lifestyle photography, your brand has the chance to create an emotional connection with potential customers by portraying an authentic situation in your images.
Create an Amazon Store page
An Amazon Store page is fundamental for businesses looking to commit to selling their products on the platform. With an Amazon storefront, you can build a homepage for your brand that authentically represents your identity and personality in order to build a more genuine relationship with your customers. You’ll be able to highlight your best-selling products and measure your success using Amazon’s reporting metrics.
Use Amazon Enhanced Brand Content
Your product gallery doesn’t have to be the only place to display your images. Sellers registered on the Amazon Brand Registry can use a feature called Amazon Enhanced Brand Content to create a modified description that includes extra images alongside information about your product.
This enhanced content will represent your brand image as polished and professional, so our Amazon product photographer will always create images with this section in mind.
PIC-UP can help with your Amazon product imagery
Ultimately, the best way to ensure your product photography is 100% compliant with Amazon image requirements, as well as ensuring your listings are perfectly set up to sell is to hire professional photographers.
At PIC-UP, not only will we follow the guidelines with complete accuracy – we’ll also use our years of experience and specialist skills to craft the most effective, creative images that are completely in line with your brand.
Ready to give your products a massive sales boost on Amazon? Contact PIC-UP today and one of our friendly team members will be in touch as soon as possible.
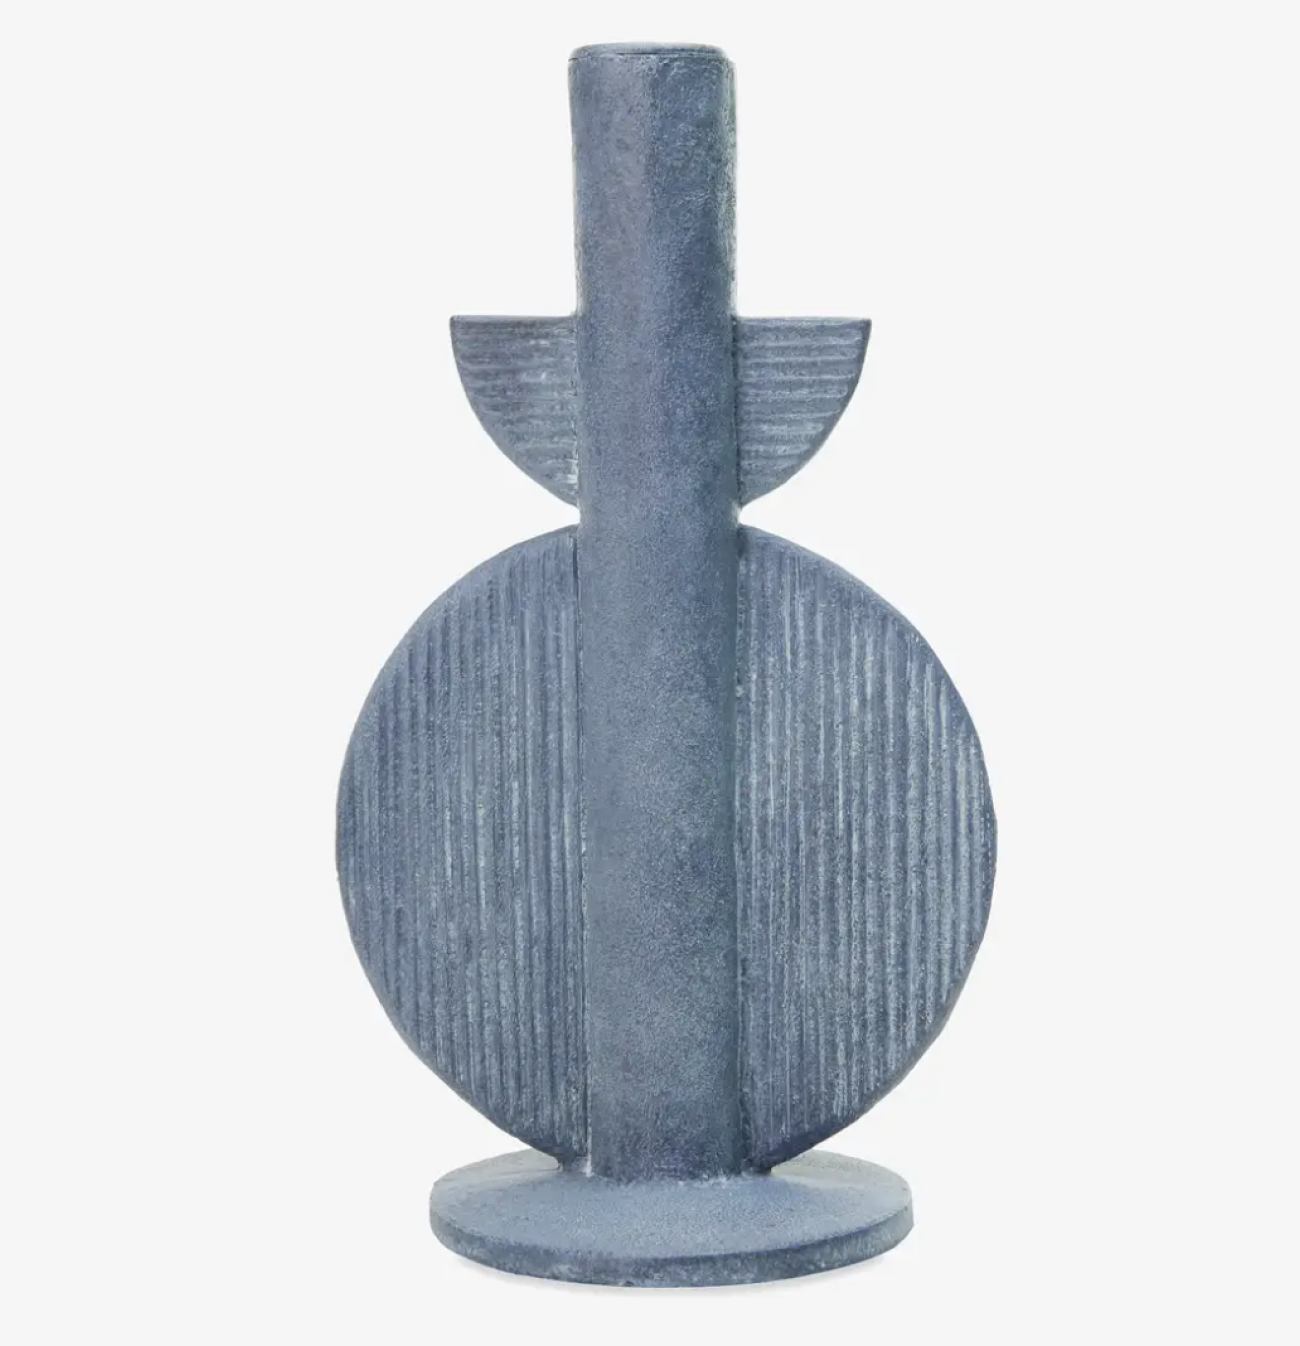
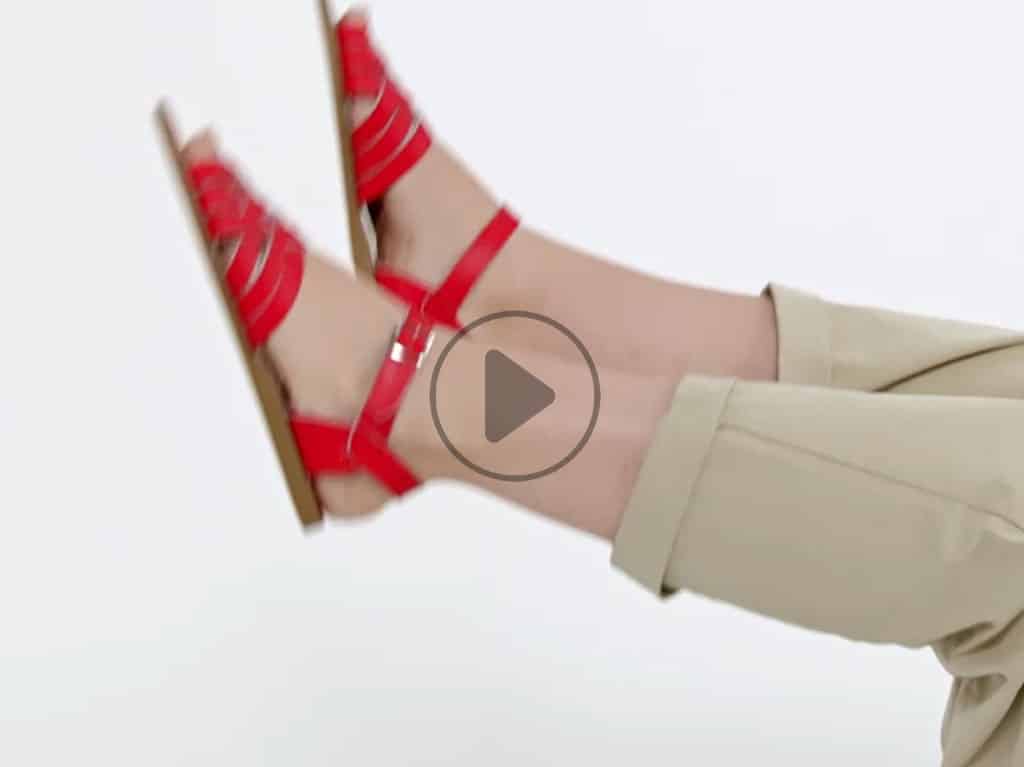
10 Types Of Product Photography That Make Your Products Sell
E-Commerce customers have notoriously low attention spans when it comes to browsing the internet, so it’s important to capture their focus immediately with your product imagery.
The quality of your product images can make or break your business. As photos are the only thing a customer can rely on to judge the standard of your product, it’s crucial to make sure these are extremely high quality – cutting corners is a no-no!
There are a number of different types of product photography shots that will serve to both effectively show off your products and entice your customers. In this blog, we at PIC-UP will show you the best types of product photography to help inspire your next brand images.
1. Flat Lay Product Photography
As far as simple product photography ideas go, Flat Lay images are fundamental for small businesses looking to tell a story in how they display their products. Seen regularly used to great success by brands on Instagram, these types of product photography shots are versatile and can be easily adapted to fit your niche.
Most commonly used by (but not limited to) clothing and accessory brands, flat lay product photography requires a lot of strategic planning and then placement to get your desired effect. We pin the products flat against the background on a wall, in order to have more control and can manipulate the shape, giving the exact desired look rather over a mannequin which will just hang on a body.
2. Ghost Mannequin Product Photography
The ultimate way for fashion brands to display their clothing range, Ghost Mannequin photography offers customers full transparency on what they can expect to receive when they order from you.
We achieve the 3D effect of this type of product photography by using post-production techniques after taking a minimum of two images of your clothing on a mannequin. The mannequin is then edited out with precision in order to offer the most accurate full front view of your product possible.
Ghost mannequin photography allows you to showcase the fit of the product without the distraction of a model, giving a highly insightful and professional image.
Despite being a fairly long process to capture the perfect image, ghost mannequin is one of the most powerful types of product photography out there when it comes to making sales. The realism on display in these images builds an unmatched level of trust with your customers and puts you head and shoulders above your competitors.
3. On-Model Product Photography
Similarly, when it comes to product photography for fashion brands, you will always see benefits when shooting with models. Whether your on-model product photography takes place in a studio or on location to provide a bit of context, your customers will be grateful to be able to assess whether the product would work for them.
The biggest perk of using these types of product photography shots is showing your clothing in motion, giving the customer a clear view of the garment’s natural movement when worn by an actual person. Not only will you offer the viewer a clearer image of the fit, length and shape of the product – there will also be an element of comparability when it comes to the person’s dimensions.
4. Packshot Product Photography
If consistency is what your business is looking for when it comes to the style of your product showcase, Packshots are the way to go. These types of product photography shots are ideal for a range of different platforms from eCommerce sites to Amazon and other marketplaces. Whatever your niche may be, this type of product photography can highlight your product’s key features and bring them to life.
As one of the most straightforward yet creative types of product photography available to ecommerce brands, a customer will readily recognise your brand when viewing one of your products in a packshot. In just a single image, your brand can portray a completely professional first impression with shadows and reflections, enabling you to build up a solid brand reputation.
5. Homeware Product Photography
Getting your homeware photography nailed can be difficult, however once you create that perfect impression on your customers it will be well worth it. Clarity is essential with these types of product photography as the market is oversaturated and you need to stand out in order to be noticed by prospective buyers.
Ideally, these types of product photography shots should be taken on a well-lit, neutral background to emphasise the key features of your homeware product. With homeware, it’s important to show various different viewpoints in order to allow the customer to imagine what the product would look like in their own home.
6. Large Item Product Photography
With large items such as furniture, it’s essential to show your customers the entire picture (pun not intended) to avoid being either misleading or not clear enough on exactly what you’re offering. Shooting larger products can be extremely difficult when it comes to logistics – however, with the right studio or warehouse setting, you’ll be able to highlight every detail necessary in your images.
Clear, white surfaces and backgrounds and the correct lighting are key to not overpowering your image in these types of photography. In order to accurately portray the object’s size as well, the camera settings need to be completely precise and correct as this will avoid distortion.
7. 360 Product Photography
Achieved using a static camera and a turntable, the intention of this type of product photography shows your customer the product from every single point of view. Due to the interactive nature of the resulting image, a customer will be much more likely to engage with your listing. Each shot taken should display your product in full view and precise post-production techniques will ensure total clarity, which means that no detail will go unmentioned.
This transparency builds an element of trust with your customer that isn’t as easily achieved using other methods. Conversion rates are often higher and returns much lower as the customer has been able to see everything they are looking for – replicating the in store experience.
8. Amazon Product Photography
For all its benefits it offers ecommerce brands looking to branch out onto more platforms, the Amazon Marketplace is extremely competitive – meaning your products will need to work to stand out. Amazon itself has several different image requirements for brands looking to list on their website, so seeking help from professionals on your Amazon product photography is key.
With PIC-UP, for example, there are several different packages we offer that meet these requirements. Depending on your brand’s niche and budget, these include:
- ECONOMY: A Basic Packshot Package
- PROFESSIONAL: Including Photography And 3D Render
- ADVANCED: Includes A Set Build
- CUSTOM: Available On Location With A Model
9. Comparison Product Photography
Online shopping often falls slightly short due to a customer being unable to truly experience the size and shape of the product prior to purchase. This is why comparison is essential when planning out your product photography – especially if your niche is an uncommon one.
If the dimensions are unclear, images lacking comparison can often feel either distorted or misleading once the customer has received the item. Comparison photography uses either models or commonly used objects to pose next to or with a product in order to allow the customer to accurately estimate the size when they’ll receive it.
10. Lifestyle Product Photography
Lifestyle photography places the object into a real life scenario, often with a model to show how the product may be used on purchase. As the customer can see themselves in the image, they will begin to associate their wants and needs with the product, which has been proven time and time again as an effective sales tactic.
These types of product photography shots offer the customer a bit of context when it comes to receiving the product, especially as a source of inspiration. It can be extremely effective when encouraging customers to convert as these types of product photography shots often generate an emotional response by selling a moment or a feeling, rather than just an item.
Innovative product photography tips with PIC-UP
If you’ve enjoyed our product photography tips and you’re looking to optimise your brand imagery, you’re in the right place! At PIC-UP, our highly skilled team offers all the above services at a high standard and best of all – we’ll pick up and return your products at no extra cost!
For more information, contact us today and a member of our lovely team will be happy to help.
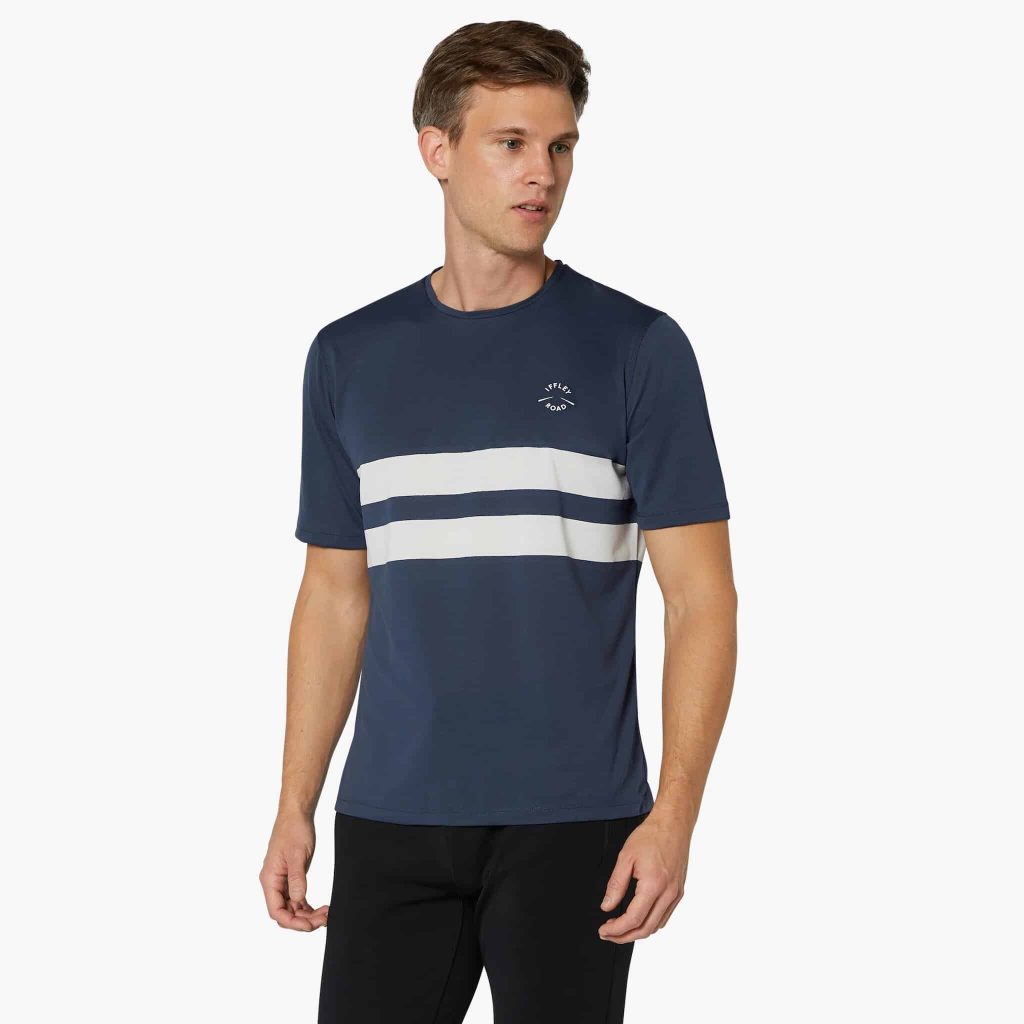
Why Casting the Right Model can Make or Break a Brand’s Image
Casting models has an enormous impact on the general acceptance of the brand, by effectively cementing its position to the consumers. A brand image is built by consistent investment into the various interactions that the potential customers have with the company and its products.
Due to variances in industry markets, the right model for your brand is that who will adequately represent your position to the potential customers. Choosing a right model will lead to increased understanding and co-operation with the customers.
Act as a Bridge between Customers and the Brand
The primary role of the model is to act as a link between the customers and the brand. Consumers rarely believe the traders’ words, and they, therefore, require human contact with the products before accepting it. The right model will accurately represent the brand through their actions and the casting methods used.
A perfectly cast model will portray the preferred clientele while increasing the interaction with the potential consumers. A wrongly-cast model will look out of place, consequently breaking the brand image and turning off potential customers.
Will Promote Brand Identity
Casting the right models will entail building the brand image by maintaining consistency. For example, in the fashion industry, brand identity is by constantly portraying the models in the company’s products.
This interaction between the models and the general public will lead to a generally accepted brand identity. Consistency in the area of application of the models will lead to the strengthening of the brand image.
The casting of wrong models will lead to inconsistencies in the brand identity, and this will break the brand image.
Will Increase Brand Recognition
Casting models entail pushing for a relationship to the general public by focusing on the human aspects. Consistency is the main factor in this aspect.
However, more often than not, there is the casting of a single model to represent the general brand image. This model first believes in the brand and is highly recognisable. By casting them, there will be an increase in the perception of the general public to the brand, therefore breaking brand image.
A wrong model is that who does not believe in the brand and using them will lead to inconsistencies in how they portray the company’s products to the potential customers and the general public.
Represent Brand Personality
Brands are built on various attributes, and these are central to the general perception of the people to the brand. Examples include a serious and conservative approach or a less serious humorous approach.
The right model will effectively portray the brand’s personality by taking up their role to balance between the various aspects that are involved. Balancing between the allocations that hold people together is the reason behind the model’s casting, and this should be personalised to the brand’s attributes.
A wrong model will wrongly represent the brand’s personality by incorporating wrong attributes in the final presentation. This will limit the perception of the people to your brand, consequently leading to the continuous breaking of the brand image.
Conclusion
Model casting should not be rushed or sniffed at, they’re the people who are at the front of your ecommerce store selling your product. If you need help finding the right model for your ecommerce photography we can help with casting.
How to upload your Product Images to WooCommerce and Shopify
The product pages have the most significant impact on sales when compared to user experience and website design. Product images present your products in the best way possible motivating potential customers to press the purchase button. Eye-catching product pages are streamlined, informative, and beautiful. Uploading clear images to WooCommerce and Shopify is an effective strategy in attracting more customers to your product.
How to upload images to WooComerce
The option to add images is available on the right-hand side when you’re adding a product in the store from WooCommerce > Products.
- This is the featured image for your product and can be set in different sizes across your online store. To add an image, Select product image in the Product image
- Upload an image or select a new one in the WordPress’s Media Library.
- If you would like to edit or change the image, click on Remove and Edit
Product Galleries
The Product gallery section allows you to display all images that are attached to a product. Product galleries are added the same way as a Product Image, but you have to use Product Gallery meta box.
Remove Images from the Gallery
To remove images from the gallery, hover over the images and then click “x.”
Customer view
After adding product images and galleries, potential customers can view them in your online store.
How to upload images to Shopify
Shopify theme has four types of images. You will work with these images, so it is vital to comprehend the differences between them.
Article Images – An image that represents a blog article that is uploaded through the article edit page in Shopify admin.
Collection images – An image that represents a collection that is uploaded through Shopify admin.
Product images – Images which are specific to an ecommerce store and uploaded through Shopify admin for each product.
Theme images – Stored within a theme’s assets folder and are usually specific to that theme.
Shopify allows you to add up to 250 images for a single product. It also automatically creates images of different sizes in different areas of your store theme. Here is how you can add images to Shopify.
Steps
- Go to the Products page, choose a product and click on it to see all the details.
- From the Images section, click on one of the Add image link or drag and drop images from the computer.
Adding Alt to Images
Alt describe images, and it is a vital way of describing your product. Alt text is displayed when an image cannot load. Moreover, it can be used by assistive technology to describe an image to a visually impaired customer. Furthermore, alt text boosts your site’s SEO. Make sure that the alt text is descriptive and short.
Steps
- Go to Products in your Shopify admin section
- Click on the product you want to edit
- Click ALT on the product image.
- Edit or add the text in the Image alt text
Click Done.
How to Make Creative Banners for your E-commerce Store’s Homepage using Photoshop
Having banners on your e-commerce website attracts potential clients to view the products on sale. Any increase in visitor traffic on the site is a sign of increasing profits since they are more probable to make more purchases. The banners offer an opportunity to tell consumers of items on sale, new products, and the featured products by the store.
Photoshop is a valuable tool that allows for the sharing of the designer’s creativity. The banner entails aligning the texture, clarity, logo and the background, with all these attainable through the use of Photoshop. Various steps need to be followed for the creation of timeless banners that will attract traffic.
Importing the Image
The first step is creating a Photoshop file, and setting the necessary resolution. After opening the program, click on “File” followed by “New”. You should appropriately save the file. You should then choose the size as 960 x 400 pixels, which will allow the image to maintain its size on either large or small screens. After this, press “Ok”, and this will cause the Photoshop artboard to load.
You should then click “File” then “Place” to locate the image. This should then be followed by dragging the image to the artboard.
Adjusting the Image
The next step entails aligning the image to fulfill the Rule of Thirds composition, which will let you focus on the focal points of the presentation. Remove the white default background by inserting the Rectangular Marquee Tool, with specific concern on not altering the shadows or image’s colour.
Use virtual grid lines to ensure that the image is perfectly aligned, with ample space for the fitting of the text. The image should be at the middle of the area since this will allow you to have room for neat application of the required texts.
Inserting Text
Perfect inclusion of the text to the banner is what will attract the customers to the website. Text offers a chance to identify the benefits of the engagements specifically and will identify details such as the brand name, specifications, and the beneficial features to the consumer. It will also include price changes if any.
Creativity is very vital across the project since it will allow for the balancing of the various aspects involved. You have to choose the font that fits the banner or optionally chose the general font on the site for uniformity.
The font size for the brand name should be larger than the description, which uses a thinner font. The size should be proportional to the image, and this should allow for quick scanning. Any promotional offer should be creatively added to the image, and should be attractive enough to attract the consumer’s curiosity.
Exporting the Banner
This is the final step in the creation of the banner, and it entails checking on the quality that will be portrayed. It allows for the attention to detail, which will later shape the perception of the people to the banner and the presentation. Creativity is rechecked at this point, and if you feel that it is not up to par, you can redo the process and come up with a presentation that will attract your clients.
How To Find Your Online Identity By Understanding Your Customer
Online identity is the primary investment that will attract customers and lead them to understand the company and the products more. For success in sales, you have to understand customer preferences, shopping habits, and the best way to attract them.
Various online sellers have nailed this, and they, therefore, make more sales over the years. Since the sale of goods is online, there is limited interaction with the customers, and all the understanding has to be made beforehand to ensure product success. How the seller portrays themselves to the customers will dictate the resultant sales.
ASOS
ASOS is an online fashion retail store based in the United Kingdom, with sales across the globe, targeting mainly young adults. It is a collection of various aspects such as sales of well known streetwear brands, and the development of in-house brands.
ASOS has developed its brand to feature the young adults. It is designed to make it cool to wear ASOS brands, and this attracts the young people. The various features on the site drive inclusiveness and allow the customers to know how to portray themselves.
The company is at the forefront in fashion development, and the site features young models trying out newer wear. Around the globe, it is the young adults who are most inclined to try out newer fashion designs, and on both, the men and women wear, ASOS nails this. The company is built on a model of giving the consumers the freedom to express themselves, which is the premise of young adults.
Young adults are often on their phones and on the internet, and they interact with various fashionable items. Style match by ASOS is a feature that allows the consumers to upload an image of a design that they love, and the system will offer a solution. This feature allows young adults to stay up-to-date and has allowed the brand to continue building itself as young and cool.
NET-A-PORTER
Net-a-Porter is an online retailer that is all about the ladies. The shop stocks women wear and features varying designs and the resultant uses that they are applied in. One of the defining features of the brand is the inclusiveness that it offers the clients while allowing them to enjoy different wear.
Net-a-porter features various elements of clothing for diverse customer needs. The brand offers multiple products that have dictated its online identity, and this has gone on to allow them to understand how to attract customers.
The elements of a high-end chic include attention to detail and recreation of timeless fashion. The company has created its online identity by focusing on the people involved in the creation of the clothes. It features high-end designers that the clientele will agree with, and which will allow it to have increased sales.
MADE
MADE is an online retailer dealing with classy and timeless furniture. The brand is built on a model of understanding customer ingenuity, and offers many choices to the customers, all with the goal of easing their lives. Simplicity is at the core of the company’s products.
The retailer understood the needs of the consumers, and this allowed them to create products that would fit into their lifestyles. Consumers want high-end minimalistic furniture, that will seamlessly fit into their lifestyles.
Quality is central to customer needs, and the retailer has built its brand by focusing on this. It targets the customers who want to live simple lives and who want an interaction with their furniture that will lead to easier lives on their part.
The brand is central to the application of the various aspects of growth, and this will allow it to make sure that they attract a unique clientele. This online identity is central to its growth over the years, and how this has gone on to shape the perception of the involved people.
Coach House
Coach House is a wholesale trader dealing with high-end, high-quality furniture solutions. The brand is built on providing trade-only furniture. The primary clientele is retailers who want to offer their customers the perfect solution for their needs. Their website has a no fuss, clean and efficient approach in showing retailers what they have in stock, leaving the retailers the freedom to sell their products in their own way.
In a bid to ensure that it maintains the supply chain, the brand conducts various tests to ensure the authenticity of the customer. The brand respects the business that they have with the retailers, and do not want to infringe on the retailers’ position in the supply chain. Simplicity in dealing with retailers is what defines the brand.
Coach House has 30 themed room sets available for viewership by the retailer and customer. The brand understands that the retailers have to present the best to their customers, and this will entail sparking their creativity by showcasing the furniture in these ranges. The customers can also view all the products on sale at their discretion, with no pricing, leading on to increased trust.
Happy Socks
Happy Socks is an online retailer, dealing with socks and underwear sales. The brand is built on fun and engagingness. The target customers are easy-going people, of either gender, who want to transform their everyday accessories into fun and engaging items.
The brand changes the perception of people to socks since it allowed people to interact more with their fashion choices. Colour is central to people’s needs, and the company understood how its customers wanted to add colour to their lives in the most unexpected of places. The customers are young and hippy and want to know how to lead their lives.
The online brand’s identity is balanced on understanding how they lead their lives and how they want to interact with each other. Socks are an integral part of the culture, but the company has built it’s brand by understanding that the customers need more colour and fun in their lives, from the most unexpected of places.
How to Add (AR) to your Shopify and WooCommerce Store
Product Images are crucial for your online store. Customers love stellar images, and the difference between high quality and mediocre images can easily break or make a buyer’s decision to purchase your products. Great images are vital in capturing a shopper’s attention and how you create inspirational, informational, and engaging experience contributes to the number of sales your business can make.
Augmented Reality (AR) enhances product visualisation. AR makes it possible for you to see virtual products in the actual environment, and the integration of Augmented Reality in Ecommerce is swiftly changing how customers shop by letting them view what they want to purchase before buying any product.
It is possible to add Augmented Reality to your online store to offer value to your consumers. When potential customers click on the Augment Button on your site from their phone, they are able to view products in a 3D setting. Furthermore, if customers are on their computers, clicking the Augment Button launches a 3D model page. This can be made possible by adding Augmented Reality to Shopify and WooCommerce Store.
How to Add AR to Shopify
Augmented Reality offers you with the ability to provide your customers with an improved sense of specifications, size, and scale of your products. Shopify AR let customers view interactive and realistic versions in AR. The 3D warehouse application allows Augmented Reality experience by letting you upload 3D models and link them to the products you sell.
Steps
Install 3D Warehouse app
- Go to the sign-up
- Enter your Shopify store domain
- Click Install
- Check the details and then Install app.
- Get 3D models
- Click the Hire a Shopify expert button on the account menu.
- Expand the New functionality section
- Go to Create 3D models of your products augmented reality.
- Answer all the questions. If you want to add product dimensions and photos at this stage, follow the guidelines.
- Click Send job
Add the 3D model to 3D Warehouse app
- Click Apps in the Shopify admin
- Go to 3D Warehouse and Click Add 3D Model.
- Put down the title of your 3D model in the Title
- Go to the Linked Product section, choose your product that the 3D model is related to and click Select product.
- Go to Upload File and Choose the .usdz file offered by your Shopify Expert.
- Click Save
Repeat this process for the .glb or .gltf file that the expert provided. Ensure the file is linked to your product so that you can have the file types associated with your product. These files are used by different features and platforms. To ensure that your store is compatible with 3D features and future AR, upload both types of file.
Edit the Theme
The next step is editing your theme codes to enable Augmented Reality Quick Look. This enables customers to view your products. Here are the steps.
1. Go to Online Store, in the Shopify admin.
2. Go to Actions, which is found next to the current theme and then click Online Store
3. Click (/) theme liquid in the Layout folder and go to the <head> tag.
4. Paste this code at the next line.
<script
src="https://cdn.shopifycloud.com/ar-quicklook-js/assets/v1/shopify3d.js"
crossorigin="anonymous"
></script>
5. Click Save
6. Go to (/) product-template.liquid at the Sections part.
7. On the top of your file, paste this code
<script>
(function(s3d) {
if (!s3d) {
console.warn('"window.Shopify3d" does not exist. Please ensure you\'ve added the <script> to your theme');
return;
}
{% for variant in product.variants %}
s3d.mapMetafieldAssets('{{ variant.id }}', '{{ variant.metafields.shopify3d['assets'] }}');
{% endfor %}
})(window.Shopify3d);
</script>
8. Click Save
Add the Augmented Reality badge
Click Online Store in the Shopify admin
- Go to Actions then to Edit code
- Go to (/) product-template.liquid at the Sections folder.
- Look for the temperate sections that are related to your product photo. Keywords like featured_image and ProductPhoto might be of great help.
- Look for the first tag<img… > in the product photo section.
- Paste his code on the line above the tag
<div class="ar-quicklook-overlay" data-shopify-3d-variant-id="{{ product.selected_or_first_available_variant.id }}" style="display: none;"></div>
- Click Save
- Go to the Assets folder and open that file with the theme’s CSS. The file is most likely to have a tile like {/}theme.scss.liquid.
- Paste this code at the bottom of your file
.ar-quicklook-overlay {
position: absolute;
width: 100%;
height: 100%;
top: 0;
z-index: 2;
}
- Click Save.
Edit the Theme
The next step is editing your theme codes to enable Augmented Reality Quick Look. This enables customers to view your products. Here are the steps.
1. Go to Online Store, in the Shopify admin.
2. Go to Actions, which is found next to the current theme and then click Online Store
3. Click (/) theme liquid in the Layout folder and go to the <head> tag.
4. Paste this code at the next line.
<script
src="https://cdn.shopifycloud.com/ar-quicklook-js/assets/v1/shopify3d.js"
crossorigin="anonymous"
></script>
5. Click Save
6. Go to (/) product-template.liquid at the Sections part.
7. On the top of your file, paste this code
<script>
(function(s3d) {
if (!s3d) {
console.warn('"window.Shopify3d" does not exist. Please ensure you\'ve added the <script> to your theme');
return;
}
{% for variant in product.variants %}
s3d.mapMetafieldAssets('{{ variant.id }}', '{{ variant.metafields.shopify3d['assets'] }}');
{% endfor %}
})(window.Shopify3d);
</script>
8. Click Save
Add the Augmented Reality badge
- Click Online Store in the Shopify admin
- Go to Actions then to Edit code
- Go to (/) product-template.liquid at the Sections folder.
- Look for the temperate sections that are related to your product photo. Keywords like featured_image and ProductPhoto might be of great help.
- Look for the first tag<img… > in the product photo section.
- Paste his code on the line above the tag
<div class=”ar-quicklook-overlay” data-shopify-3d-variant-id=”{{ product.selected_or_first_available_variant.id }}” style=”display: none;”></div>
- Click Save
- Go to the Assets folder and open that file with the theme’s CSS. The file is most likely to have a tile like {/}theme.scss.liquid.
- Paste this code at the bottom of your file
.ar-quicklook-overlay { position: absolute; width: 100%; height: 100%; top: 0; z-index: 2; }
- Click Save.
Add AR to WooCommerce
WooCommerce makes getting started very easy with a simple installation and setup wizard to get your online store running.
Installation
WooCommerce plugin is installed just like the other plugins. Go to the Plugins options and search for this plugin. Install and activate it.
Setup
After installing WooCommerce, the Setup Wizard takes you through configuring basic steps to run it in the WordPress. Your e-commerce options are infinite, and the Setup Wizard helps you choose the most important ones.
AR for WooCommerce Users
The WooCommerce Augmented Reality Quick Look allows people to show their products in AR. To use the plugin, you will need a Safari browser that runs on iOS 12 device.
Buy the WooCommerce Augmented Reality Quick Look plugin. This plugin allows the users to use 3D photos and models to your WooCommerce shopping cart to offer an interactive augmented reality experience for all of your customers which help increase your sales.
This plugin offers a simple file upload which is located where the products are edited and takes care of the entire configuration.
Mobile Ecommerce
Customers with tablets, phablets, and photos are a growing demographic, and AR in WooCommerce ensures that your customers have a fantastic experience no matter which handset they are shopping from.
Add the Augmented Reality badge
- Click Online Store in the Shopify admin
- Go to Actions then to Edit code
- Go to (/) product-template.liquid at the Sections folder.
- Look for the temperate sections that are related to your product photo. Keywords like featured_image and ProductPhoto might be of great help.
- Look for the first tag<img… > in the product photo section.
- Paste his code on the line above the tag
<div class=”ar-quicklook-overlay” data-shopify-3d-variant-id=”{{ product.selected_or_first_available_variant.id }}” style=”display: none;”></div>
- Click Save
- Go to the Assets folder and open that file with the theme’s CSS. The file is most likely to have a tile like {/}theme.scss.liquid.
- Paste this code at the bottom of your file
.ar-quicklook-overlay { position: absolute; width: 100%; height: 100%; top: 0; z-index: 2; }
- Click Save.
How Good Product Photography Increases Revenue
Product photography entails the featuring and perfect representation of a specific commodity to the consumers. Impeccable images optimise the view of the product, and this ultimately leads to higher sales conversions.
Product photography involves capturing and subsequent editing of the images. Striking a balance between these two aspects will lead to quality photographs that will ultimately have an impact on the customer. The consumers’ preference for better images will lead to increased revenue for the seller.
Better Click Rate
Perfectly taken images increase the traffic on a site. Attracting many visitors to a website is the most critical aspect in e-commerce since it will increase the probability of the making of sales.
In online shopping, the premise of making purchases is the understanding of how the products will impact their lives. Good product photography will incorporate aspects of use, and this will translate to increased traffic as the consumers focus on the products on offer.
The more images on a site, the higher the perception of the people to the products on sale. Top quality images increase the curiosity in the consumers, and after they interact with the products on sale, they will most probably buy the goods on sale.
Building Customer Trust
E-Commerce entails presenting an actual product to a customer through virtual channels. In most cases, the potential customers do not have a connection to the product or even to the sellers. Unlike in location-based transactions, the customers have limited interaction with the parties and goods involved. They effectively do not understand the practicability of the products on sale.
Good product photography, however, builds a bridge between the various elements of the transactions involved. The images will represent the products in use and will allow the users to either zoom in and view the products better, thereby eliminating the touch and feel barrier as in traditional selling.
Good product photography represents the sellers as traders who care for the use of their products by the final consumers. The increase in customer trust in the sellers will lead to increased sales and consequently increased revenue.
Enhance Brand Identity
Good product photography comprises of building strong customer perceptions of the products on sale. The consistency between the images on the e-commerce site serves to develop the brand identity of the sellers.
Professionally capturing, editing and presenting the photos will lead to the increased representation of the brand, and is an indication of the seller’s belief in their brand. By simply viewing the images, customers can conclude all this and will make decisions based on the representation therein. A strong brand identity will lead to increased revenue.
Provide Wholesome Product Information
One of the common barriers in e-commerce is the touch and feel barrier that limits customer confidence on the product on sale. Potential customers will not believe the perceived uses by the seller but will want to actually receive a testimonial. The product in use photos can achieve this.
Reducing the questions that the customer is asking themselves as they consider your product will increase the chances that they buy it. Providing comprehensive information on the product will increase sales. Carefully choosing the images to include to represent practicability will solve most customer questions.
Reduces Return Rates
Colour mismatching is a common reason for return for online products. The slight changes in colour schemes may affect sales in colour based industry such as clothes. Since it is the image that drove them to purchase the product, consumers who get wrongly captured colours will demand returns from the sellers while leaving negative reviews on the site.
Good product photography dictates that there is an accurate representation of the products and their colours. Perfect colour representation will reduce the customer’s return rates, increase customer rating, and boost the seller’s revenue.
Act as a Social Trigger for Purchases
The seller has to choose the best image for use on the website. The parameters involved include high photographic quality and accurate representation of the product in use. The photos can make or break the sales of the product, and should, therefore, be carefully chosen.
Professionally taken photos will capture the interest of the viewers, more so when they are represented to solve a problem for the customer effectively. The images will pull the viewers to the product, and they will then make purchases.
Increase Customer Return Rate
Any business is built on attracting and developing the existing customer base. For any e-commerce website, effectively pulling back the consumers who made purchases on the site is the primary reason for their existence. Returning customers serve as brand ambassadors by highly rating the products and inviting those around them to the e-commerce sites.
Good product photography will accurately represent the products on sale. When the customers feel that there was an accurate representation of the products, they will have increased confidence in the site. They will, therefore, visit the website more often, and this will lead them to make more purchases in the future. The increase in returning customers will increase site revenue.
Increases Photo Usability
The premise of product photography is allowing more potential customers to interact with the images. Professionally taken photographs rank high in search engines, and this will lead to increased interaction with the consumers.
Bloggers often feature quality photographs, and this will increase the online presence of the brand. When the photos are widely shared on social media, they reach more potential customers. When there is an increase in the online presence of the photos and the brand, there will be increased sales and consequently revenue for the sellers.
Conclusion
Professionally captured and edited product images offer an opportunity to represent your products to the potential customers perfectly. This article has described the key benefits of good product photography while showing its relation to increased sales.
As the first point of interaction with your customers, you should effectively invest in perfect product photography to appeal to them and subsequently increase the revenue.
How to Create a GIF from your Product Images in 5 Steps
GIFs are awesome and can be used in many ways. For instance, they are used at Buffer in customer services tweets, Slack channel, and emails. GIFs are included in team news and marketing emails. Besides, GIFs can be used anywhere a message is being sent. GIFS generates great results, especially in Twitter engagement. Check out the following steps that can allow you to easily create GIFs from your product images.
Create a file folder
Create a new folder and select images you would like to include in your GIF and transfer them to the folder. For instance, if you want to create a GIF for your dress, you can choose six images and combine them to develop a 360-degree rotation. This kind of GIF is the best because a prospective customer can view your products in all dimensions.
Make use of Photoshop
Go to File then to Scripts and then Load Files into Stack. After completing the steps stated, a pop-up window appears. It allows you to select the folder that you created in the first step. Click Browse and choose the images you added in the new folder and tap OK. Photoshop creates a new file with your images layered vertically from the first one.
Ensure that you arrange the layers in numerical order according to the names you assigned them after you retouch them. If the images are not arranged in order, drag and rearrange them so that your products can rotate in a clockwise motion. Moreover, ensure images are aligned so that the GIF animations switch from frame to frame.
Use the Animation Palette to create frames
Go to Window then to Animation and open Animation Palette. The Animation Windows appears on the screen at the bottom. Click the menu at the top right and choose Make Frames From Layers. It is advisable that you click the lower icon on the right to be sure you are in the frame view rather than the timeline view.
Set the duration of the frames
Go to Select All Frames in the top menu. At the bottom of one frame click the drop-down arrow to preset time duration and speed for the frame. You can change each frame separately meaning that if you want one frame to appear longer, set it for a longer period.
On the first frame in the animation frame palette at the bottom left, you can set the number of times you’d like your GIF play or ‘loop’ when it’s being viewed. It is recommended that you choose continual animation so that viewers can admire your item for as long as they want.
Save your GIF
After setting your frames with the duration and order you want them to have, save the animation. To save a GIF file, go to File and then Save for Web & Devices screen. Ensure all the settings in this screen are set to your liking and then tap Save to choose the GIF that you created in the first step. Now your GIF is ready for sharing.